
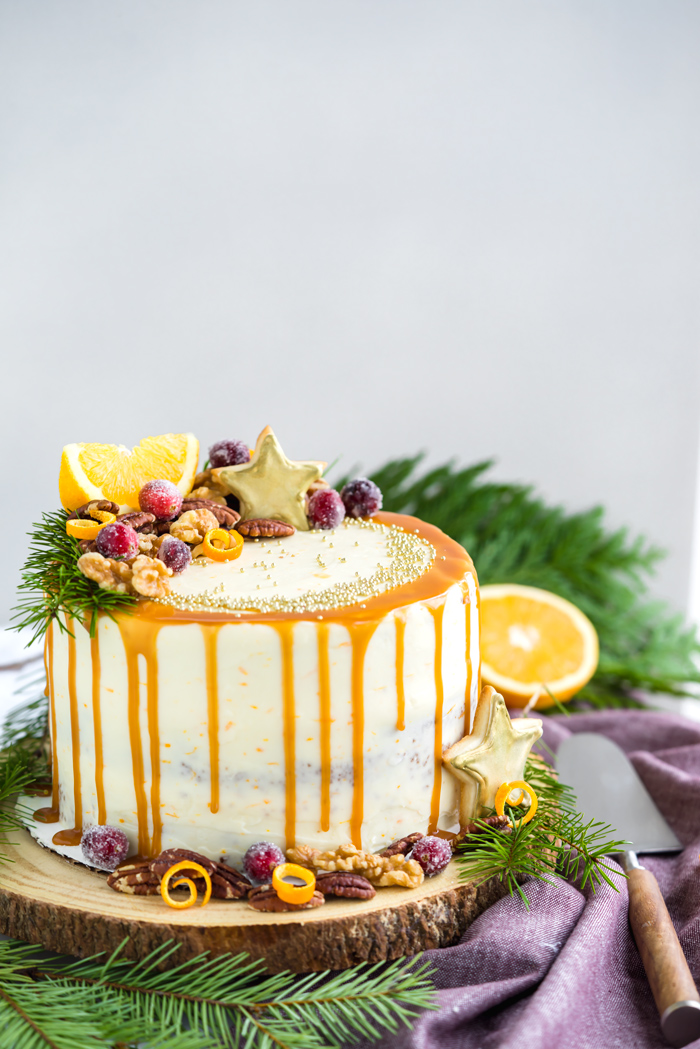
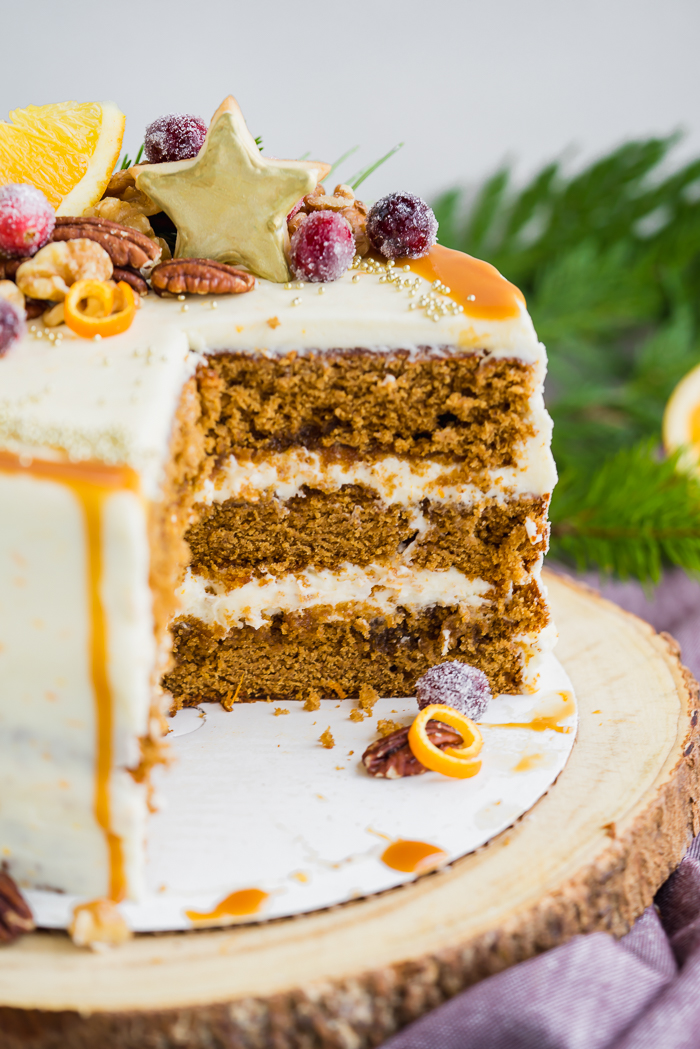
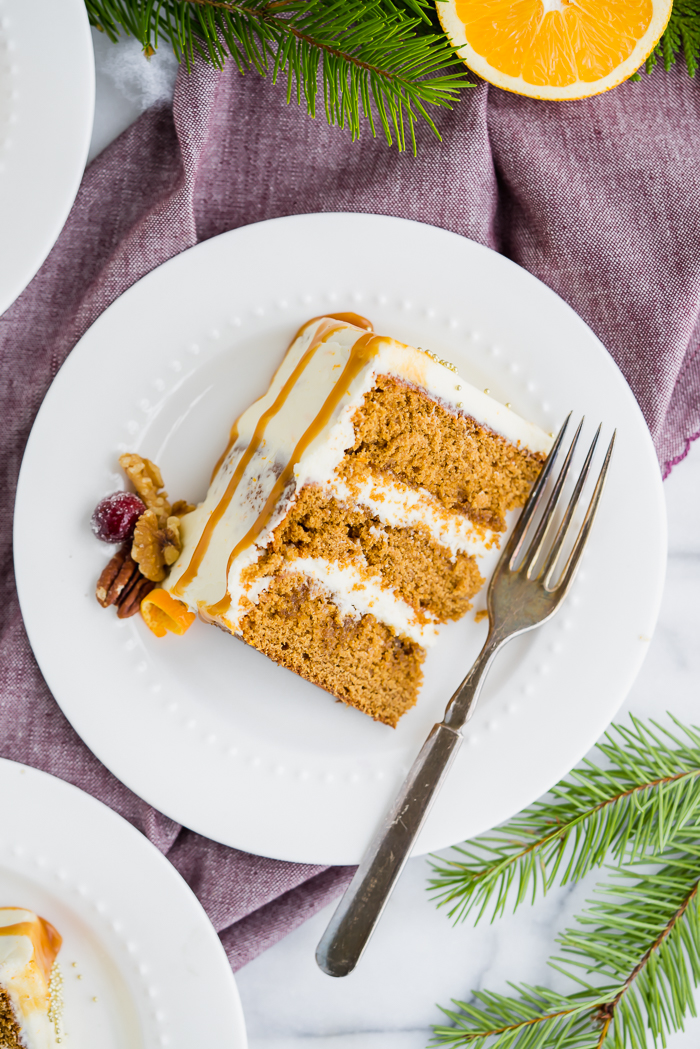
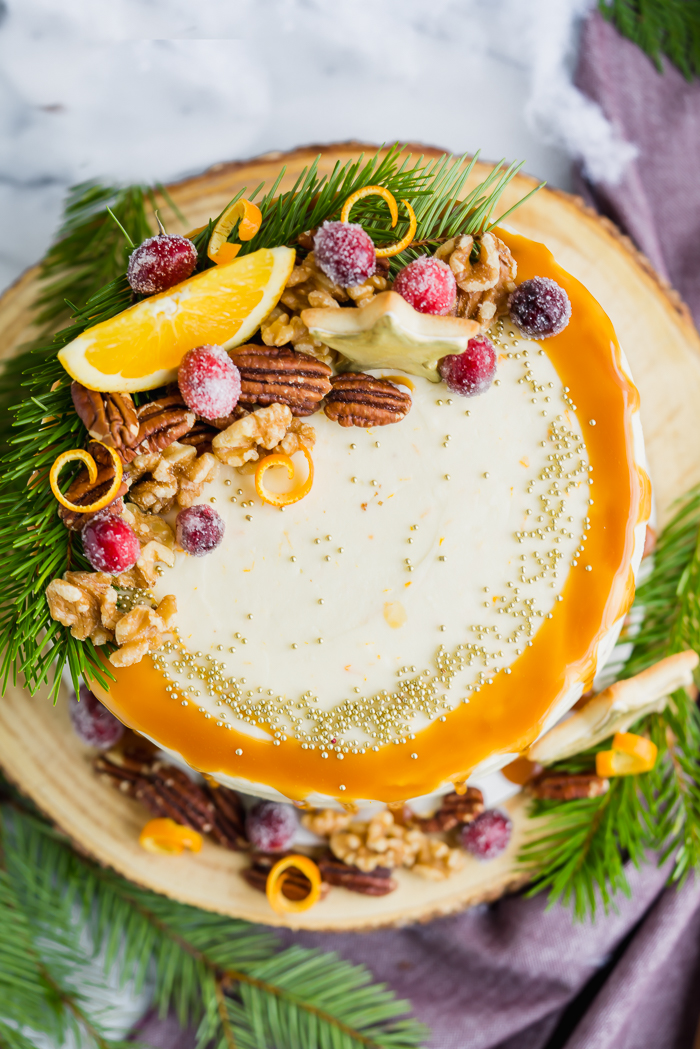
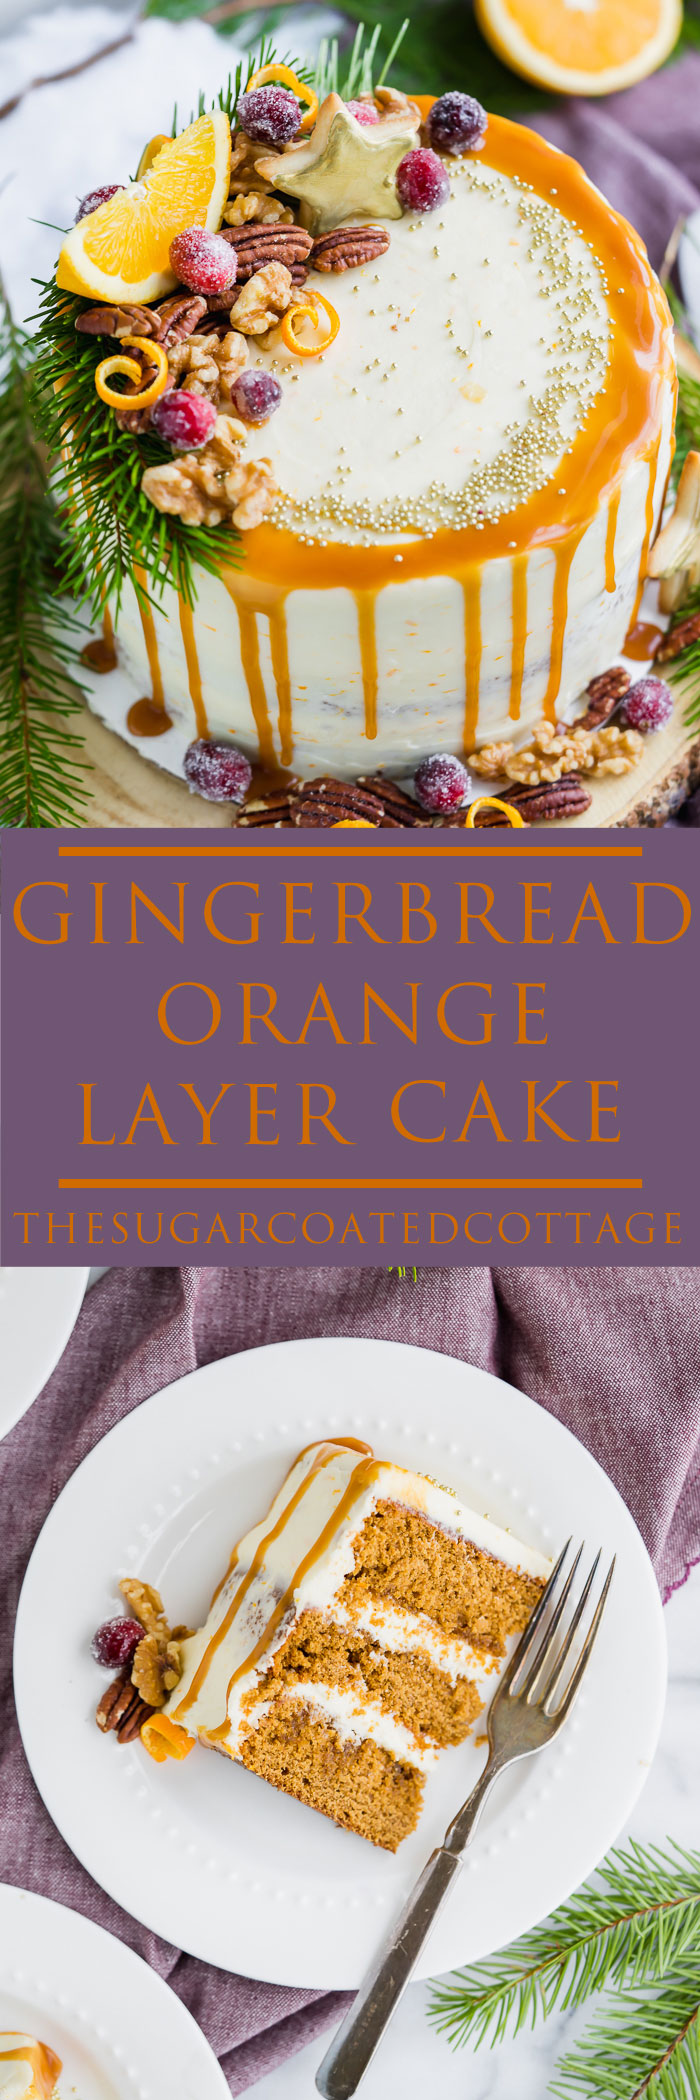
Gingerbread Orange Layer Cake. Three layers of orangey rum glazed gingerbread cake coated in an orangey cream cheese buttercream!!
Christmas will be here a few short weeks everyone, are you counting down to? I’ve never lost that childlike excitement 😉 . Speaking of exciting, I was asked to join the Virtual Gingerbread Swap!! I am so excited to join this group of talented bakers and bloggers! So make sure to check out all the great gingerbread offerings, I have all the links at the bottom of this post.
Gingerbread is one of the most iconic holiday flavors! Not only does it evoke nostalgic feelings but in addition all those flavors are warming for the cold temps many of us are experiencing right now. As a child I can remember decorating and eating gingerbread cookies. Back then I didn’t quite understand what made a gingerbread cookie different but I knew it tasted darn good with that sweet icing! I decided to turn that love of gingerbread cookies into a cake. The Gingerbread Orange Layer Cake.
The Gingerbread Orange Layer Cake breakdown:
- The cake layers are full of that lovely gingerbread spicing we remember as kids and still love today.
- In addition to the spicing we have orange zest to add a little sweet citrus note.
- Each layer is glazed with a Rum simple syrup that builds on the already wonderful flavor profile.
- Last but not least this cake is layered and enrobed with Orange Cream Cheese Buttercream. I had to start each word with a capital because this buttercream deserves a title all it’s own. Not only does it taste orangey but you can see little flecks of orange zest which just adds to the beauty of this cake.
- Because cream cheese is the base of this buttercream it is smooth, creamy and soft so it melts like butter with each bite.
Decorating:
For the decorating I chose to go with a semi-naked finish. The cream cheese base makes for a softer buttercream, one that cannot be piped (at least not this particular recipe). So I kept the icing of the cake simple. I had some fun and sugared cranberries (1/2 cup cranberries, very tiny squeeze of lemon juice and about 2-3 Tbsp sugar, toss around until coated and lay on baking rack to dry) for a little pop of red. An orange wedge and curled orange peel to hint towards the flavoring. Some pecans, walnuts and a couple sugar cookies I had left from last weeks post for small batch sugar cookie recipe. A little greenery and of course sprinkles! Oh and a caramel drip, because everyone loves a drip 🙂 .
This Gingerbread Orange Layer Cake is the cake of all cakes for the holidays!! You and your guests will love every single bite and may even go back for seconds. If you are like me you will definitely go back for seconds 😉 . So make this cake, grab a cup of coffee/tea, a warm throw, sit by the fireplace and reminisce with friends and family as you enjoy each bite.
Check out all these wonderful Gingerbread inspired recipes from my blogging baker friends!! Links below, all the posts go live at 11am Eastern. Enjoy and Happy Baking!!
Treats from Our Virtual Gingerbread Swap
- Gingerbread Biscotti from The Sweet Rebellion
- Ginger Molasses Cookies with Candied Ginger from Wild Wild Whisk
- Christmas Gingerbread Trifle from Sugar Salt Magic
- Gingerbread Cupcakes from Pies and Tacos
- Baked Gingerbread Doughnuts from Two Cups Flour
- Holiday Gingerbread Cake from No More Mr Nice Pie
Enjoy!
Stacey
PIN IT FOR LATER! Thanks.
Gingerbread Orange Layer Cake
Ingredients
Method
- Preheat the oven to 350°F.
- Lightly grease and flour 3 x 7” pans and place parchment on the bottoms. This is a sticky cake so please do not omit the parchment paper on the bottom of the pans.
- In a large bowl add the flour, spices, salt, baking soda, and baking powder. Stir with whisk to combine. Set aside.
- In bowl of mixer fitted with paddle attachment beat together the butter and sugar until fluffy.
- Add the eggs one at a time, beating well and scraping the bottom and sides of the bowl after each addition.
- Add in the orange zest, vanilla and molasses. Mix well to combine.
- With mixer on low speed add the flour mixture in by spoonfuls alternately with the water, starting and ending with the flour.
- Mix just until well combined and smooth.
- Pour the batter evenly into the prepared pans, smoothing the tops.
- Bake for 30-35 minutes or until a cake tester inserted into the center comes out clean.
- Cool completely.
- GLAZE:
- Add all ingredients into small pan and bring to a simmer only until sugar is dissolved. Let cool 5 minutes.
- Cut any humps off top of cake layers, take a skewer or toothpick and poke random holes on the tops of each cake (this will allow for glaze to seep into cake. Brush the cake layers with the glaze.
- BUTTERCREAM: * (see notes regarding quanity)
- Cream the cream cheese and butter together until light and fluffy.
- Add in the vanilla, orange juice and orange zest, mix well to combine.
- With mixer on low speed add in powdered sugar one spoonful at a time until well combined and completely mixed and creamy, about 3-5 minutes of mixing after all powdered sugar is added. Scrape down sides of bowl as needed.
- Note: This is a soft frosting because of the cream cheese, it does not pipe designs due to its soft nature.
- ASSEMBLY:
- Place dab of frosting on cake board/cake plate to keep cake in place.
- Place the first cake layer on the cake board/plate.
- Spread a large dollop of buttercream on top and spread evenly to the edges of the cake.
- Place next cake layer on top and spread with buttercream.
- Repeat with with remaining cake layer until all are stacked.
- Once all the layers are in place apply a crumb coat ** (see notes) of buttercream around the top and sides of cake. Refrigerate at least 45 min. (Crumb coat gives a nice smooth base to work with when ready to apply final coat of buttercream and decorate).
- Apply final coat of buttercream, I chose a semi-naked cake design for this but I still used a crumb coat to keep the final coat clean.
- Decorate with fruit, nuts, sugared cranberries and any holiday cookies and greenery you may have on hand.
Notes
**Highly recommend crumb coating and refrigerating this cake before the final coat. Due to the softer nature of this frosting chilling it before the final coat will make for a smoother coating.
Tried this recipe?
Let us know how it was!Recipe adapted from King Arthur Gingerbread Bundt Cake recipe.
This just looks so beautiful as all your cakes always do. I love the syrup coating every layer. This virtual gingerbread swap was so much fun 🙂
Hi Marie! Thank you so much for inviting me to take part in this I had so much fun! So glad you like the cake, the syrup makes all the difference. Take care. 🙂
What a beautiful cake you brought to this swap!! Absolutely gorgeous
Hi Camila! Thank you so much, being part of this swap was so much fun! Take care 🙂 .
This cake is absolutely gorgeous!! Enter many heart emojis here!!! It would be the perfect centerpiece at any holiday party.
Hi Trang, thank you very much! I am so thrilled that I was invited to be part of this swap, thank you. Take care 🙂
Stacey, you rock ! Thank you for the beauty !
Thank you 🙂 , you’re so welcome! Take care.
This looks delicious. Time to enjoy all the gingerbread I can, this season.
Thank you so much! Agreed, all things gingerbread 🙂 . Take care.
wow!! what a beautiful cake.I will make this cake during the Christmas season. should be perfect for that time of year..
Looks delicious
Hi Helen! Thank you, you love it! Take care 🙂
Hello Stacey! Every year I bake some layered Christmas cake and when I saw this recipe I knew its gonna be your gingerbread orange cake this year! It’s gorgeous and I can’t wait to try it! Beforehand I wanted to ask how did you do the orange drip on edges?
Hi Ada, its an honor you would select this cake for your Christmas. I used caramel sauce in the jar for the drip. I used a thicker, caramel from the jar, Sanders brand is what I prefer. It is deeper in color and thicker. But any brand that is just as good will work. I put it in a piping bag so I can control it and gently squeeze around the edges, letting some of the caramel drip down the sides. Enjoy your Christmas! Happy baking. Take care.
I don’t even know hoow I ende up here, but I thought this post
was great. I don’t know who yoou are but definitely you’re going to a famous blogger if you are not already 😉 Cheers!
Thanks for the kind words Taylor! Take care. 🙂
I made this cake last December for my bosses birthday and it was by far the best cake I ever made!! The combination of flavors including a touch of sugared cranberries made the flavors pop in your mouth. This recipe is great for special occasions! Delicious!!!
Hi Susan, I’m so happy that you still remember this cake almost a year after making it, that says a lot 🙂 Thank you for letting me know how much you liked it. Happy baking! Take care.
This cake looks absolutely gorgeous!!! I can’t wait to make it. Please tell me what you used for you caramel drip?!?
Hi Julie, thank you for the question. I used jarred caramel for the drip. My favorite is Sanders brand, its a darker/thicker caramel. If you cannot find Sanders any caramel that is thick and deeper in color will work just fine. I heat mine a little bit, you don’t want it hot but it should be pourable. Chill your cake prior to adding the drip, that will help set your buttercream in place. Then I use a spoon or piping bag to apply it and let it drip. Enjoy the cake, take care 🙂
Turned out beautiful and tasted amazing! I saved the extra frosting and made a second cake 2 weeks after the first!
Hi Patty, I’m thrilled this cake was a hit for you. Extra frosting is always a good thing 😉 . Thanks for letting me know. Take care and happy baking!
Hello! This cake looks amazing! Can the cake layers be made ahead of time and frozen? Looking to simplify a busy holiday season 🙂
Hi Liana, thank you. Yes, the cake layers can be baked ahead of time and frozen. I would suggest wrapping them in three layers of plastic wrap so they are protected from frost bite. When it’s time to use them just let then set on the counter to bring them to room temperature. Happy baking! Take care 🙂
Hey, I made this cake, and it’s soft, delicious, rich, just perfect for Christmas. Since I’m from Europe it makes a bit diificult to convert it to metric. Coud you provide a metric version for your future recipes, pls? Thank you 🙂
Hi Edit, I am so happy to hear you liked this cake for your holiday. I will see what I can do for future recipes. I know this would be helpful for many. Thank you for letting me know. Take care. 🙂
Just wondering if you used regular or blackstrap molasses? Looking forward to making this! Thank you.
Hi Terri,
I used regular molasses. You could use blackstrap, it will give a stronger molasses flavor though. Happy baking!
Hi Stacey! I’m planning to do this cake for xmas, but wanted to ask you, since i cannot bake all 3 cake layers at the same time, do you think it’ll be ok if I prepare the cake batter and then bake each layer separately, one after another? Can I leave this batter unbaked for so long? Let me know what you think. Thanks in advance and Merry Christmas!